![Sonio-logo-samsung-1 1-1.png]](https://lp.sonio.ai/hs-fs/hubfs/Sonio-logo-samsung-1%201-1.png?height=40&name=Sonio-logo-samsung-1%201-1.png)
What you'll learn
- How Sonio labels and separates each fetus in a multifetal exam.
- How images are associated to the right fetus, automatically and manually.
- How measurements, dating, findings, and impressions work per fetus.
- How mandatory fields and the report behave for multiple fetuses, including a demised fetus.
Before you start
A few conditions need to be in place for the multifetal experience to appear:
- The multifetal automation site setting must be enabled by Sonio. This is a per-site rollout and is off by default.
- Your organization must allow multiple fetuses ("Enable Multi-Fetus Support"), with a "Max Fetus Count" (Max 4 fetuses).
- Scanning clinician (sonographer/physician) must adjust the fetal # setting on the ultrasound system from singleton to the correct number of fetuses being scanned.
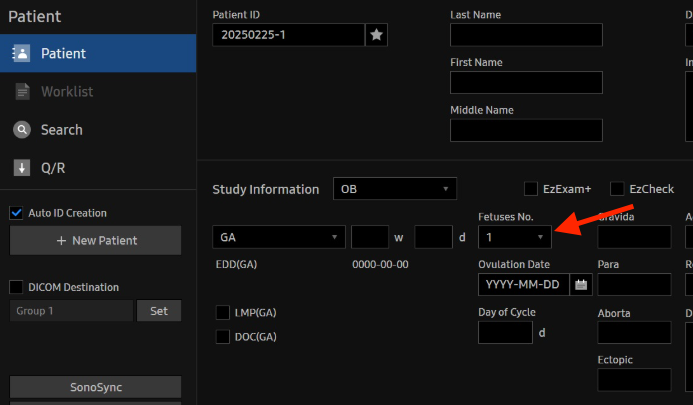
- The multifetal UI in Sonio appears once the exam has 2 or more fetuses identifiers received from the SR file sent from the ultrasound system at end of exam.
How it works
Sonio treats each fetus as its own documented subject inside one exam:
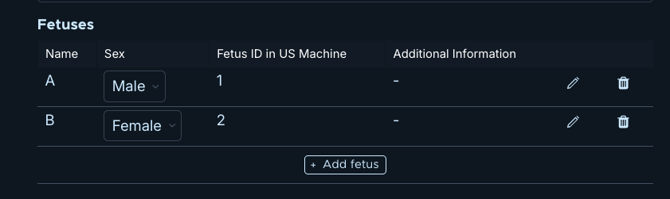
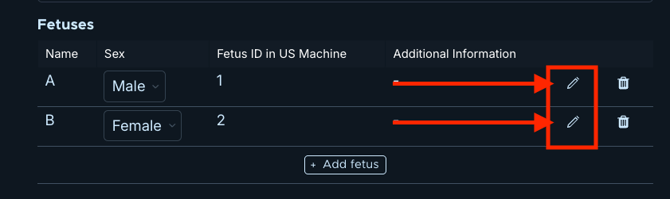
- On the “Prepare Exam” page ****in Sonio, each fetus is labeled Fetus A, Fetus B, Fetus C (auto-assigned). These labels are read-only. You cannot rename or swap them, and you cannot swap the Fetus ID sent from the ultrasound.
- In the “Media Gallery”, images are associated to a specific fetus automatically if the image contains a recognized annotation (ie Fetus A, Twin A, etc..). Images can also be manually associated to the correct fetus when needed.

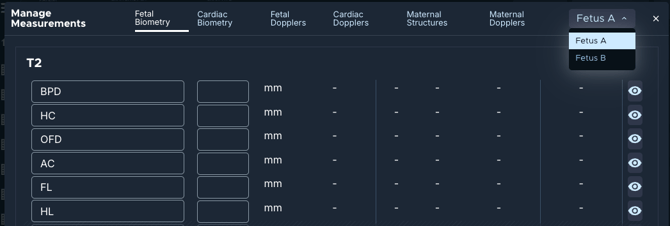
- Measurements are mapped to Sonio’s measurement report page per fetus as designated by the ultrasound machine. Sonio’s report template page will display all labeled measurements in accordance to their fetal ID and description. Percentiles are computed per fetus once dating is assigned.
- Dating, findings, and impressions are handled per fetus. Biometric (ultrasound) dating rows are per fetus; manual methods (LMP, conception date, EDD) apply to the pregnancy as a whole. Clinically a single assigned gestational age is typically used for the pregnancy.
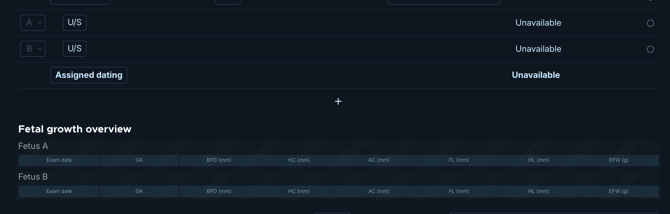
- The report shows per-fetus sections (for example "Fetus A", "Fetus B") for biometry and growth.
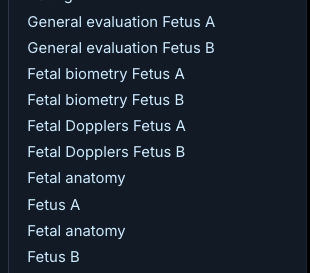
- Mandatory fields are validated per fetus before you can submit or sign.
Step-by-step: Document a multifetal exam
- Confirm the fetuses in the Fetuses table. On the Prepare exam page, open the Fetuses table. Set or confirm the number of fetuses. You can use Add fetus, or let the count come from the ultrasound machine (the machine only adds fetuses, it never removes them). The table shows Name (the read-only A/B label), Fetus ID in US Machine, Sex, and Status. You can also declare a fetus demised here.
- Associate images to each fetus. Sonio reads twin annotations from the machine and associates each image to the right fetus automatically. An AI marker shows when Sonio made the association. For images with a missing or ambiguous annotation, Sonio leaves them in a "To annotate" area for you. To correct or assign manually, use the Fetus re-association control on the image (this overrides the automatic guess), or filter the media gallery by Mother and fetuses / Fetus N to review and fix.
- Document each fetus. Record measurements, dating, findings, and impressions per fetus. Use the fetus filter (Mother and fetuses / Fetus N) for indications and findings. Impressions and canned comments fill in per fetus through dynamic variables (gestational age, estimated fetal weight, presentation, placenta).
- Complete each fetus's mandatory fields. Mandatory fields are checked per fetus. Each fetus must be complete before you can submit or sign.
- Submit or sign. Once every fetus passes its mandatory-field check, submit or sign as usual. A reader reviews and signs the same way they would for a single-fetus exam.
💡Tip: annotate twins on the machine
Annotate images as "Twin A" and "Twin B" on the ultrasound machine so Sonio can auto-associate them to the right fetus. Sonio also recognizes "Baby A/B", "Fetus A/B", and labels like "A 4CH". An "A" with no view, cineloops, and split views showing both fetuses in one frame are not auto-associated yet, so review those in the gallery.
⚠️ Labels and machine IDs in Sonio are read-only
You cannot edit fetus labels or swap the per-fetus machine ID from the exam page. These controls are disabled to protect data consistency. If you need a genuine correction, request it through a Sonio support ticket. [CHECK: confirm the current support process to request a fetus label or ID correction.] For a demised fetus, mandatory fields are waived.
Demised fetus
To document a demised fetus:
- Declare the fetus demised in the Fetuses table on the “Prepare Exam”.

-
The report adds a Demised Fetuses section in the sidebar, with a Show toggle that controls whether that fetus's fields appear.
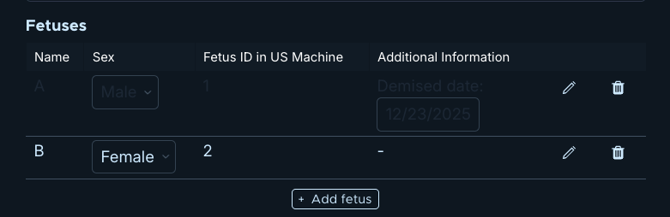
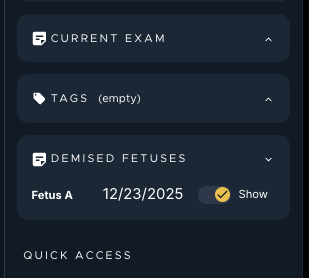
- Mandatory fields for the demised fetus are waived. The other fetuses are unaffected.
- Labels are never changed when a demised Fetus is declared and each fetus will remain labeled with the same designation as initial exam(s).
- For a demised fetus, you may need to re-associate the surviving fetus's machine ID on each new exam.
💡Tip: Annotate twins on the machine (Demised fetus)
Keep annotating the viable fetus with the same identifiers as the initial exams for both images and measurements. If the viable fetus is “B”, ensure you continue to label all images and measurements as “Fetus B”. For proper image sorting and measurement documentation on the report.
See How to remove fetus in case of fetus demise for the full process.
Common questions / troubleshooting
An image went to the wrong twin. How do I fix it?
Open the image and use the Fetus re-association control, which overrides the automatic guess. You can also filter the media gallery by Maternal and fetuses / Fetus N to review and correct associations. OCR can occasionally mis-match a twin annotation, so re-associate manually when that happens.
A single exam shows an extra fetus. What do I do?
Delete the extra fetus. If it recurs, report it to Sonio support.
How do I set the number of fetuses?
It will automatically be set from the SR measurement file sent by the ultrasound if added by the scanning sonographer. If not you can set it when the exam or pregnancy is created, add fetuses during the exam in the Fetuses table on the Prepare exam page using Add fetus, or let Sonio detect them from the ultrasound machine. The machine count only adds fetuses, it never removes them.
Can I rename or swap fetuses?
No. Fetus labels are read-only, and you cannot swap the per-fetus machine ID from the exam page. These controls are disabled to protect data consistency. Request a correction through a Sonio support ticket.