![Sonio-logo-samsung-1 1-1.png]](https://lp.sonio.ai/hs-fs/hubfs/Sonio-logo-samsung-1%201-1.png?height=40&name=Sonio-logo-samsung-1%201-1.png)
ℹ️ Why this matters
With your new TeleMFM setup, exam status is now visible directly from your Sonio dashboard — no more clicking into each exam to check whether a report has been signed. TeleMFM exams are identified by a blue MFM Connect tag on your dashboard. To take full advantage of this change, you'll need to do a one-time update to your existing tabs so that TeleMFM exams appear correctly alongside all your other exams, without any duplicates.
What you'll learn
- Update your existing dashboard tabs to prevent TeleMFM exams from appearing twice
- Add the TeleMFM platform column to identify teleMFM exams at a glance
- Set up recommended tabs for your daily workflow
- Optionally create a dedicated tab for exams sent for MFM interpretation
Before you start
- This guide applies to sonographers after the new TeleMFM configuration has gone live on your site.
- You'll need access to your Sonio dashboard
How it works
Previously, when an exam was referred to a reading physician via TeleMFM, sonographers had to either switch into the reading physician's org or click into each individual exam to check whether the report had been signed. With the new setup:
- Exam status is visible directly on your dashboard for all exams, including TeleMFM cases.
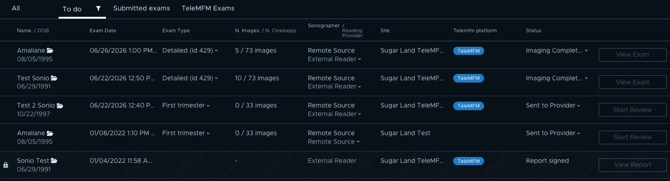
- TeleMFM exams are flagged with a blue TeleMFM tag, which you can surface by adding the TeleMFM platform column to your dashboard.
- Because status is now shown natively, the old Referred by filter is no longer useful — and if you leave it active in your tabs, each TeleMFM patient will appear twice (once as the referred-by source entry with no data, and once as the fully populated exam).
The one required action: update every existing tab to exclude the Referred by exam status.
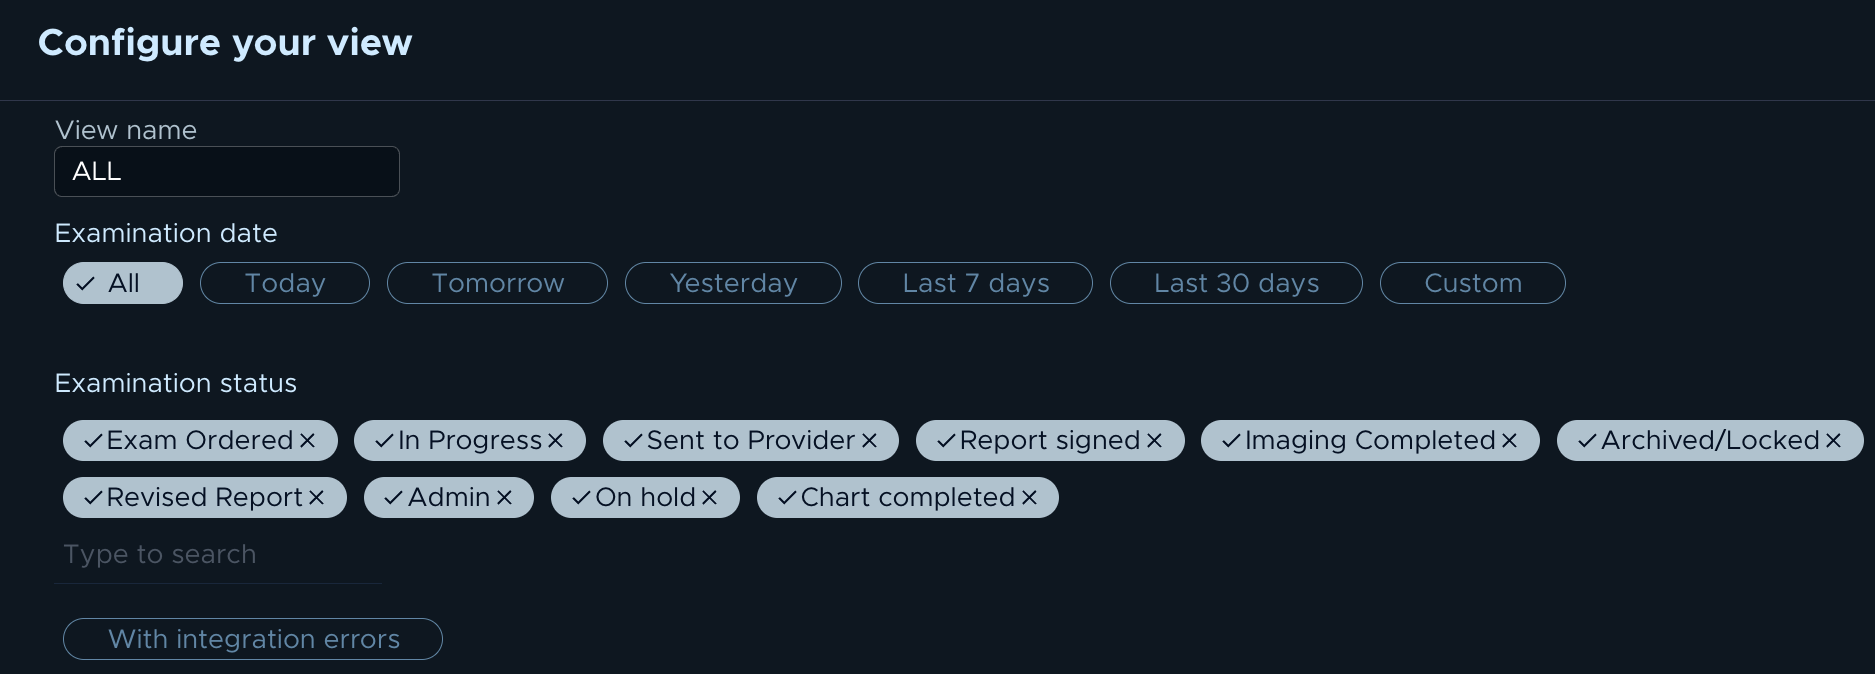
Step-by-step: Update your "All" tab (required)
⚠️ Warning: The All tab has no filters by default, which means it will surface duplicate TeleMFM exams unless you update it. This is the highest-priority tab to fix.
- On your dashboard, go to your All tab.
- Open the tab's filters.
- Under Examination status, select all statuses except Referred by.
- Optionally, also filter by the Sites you work at to keep the list focused on your location.
- Exit the configuration window. Your new set-up is now saved. The duplicate TeleMFM entries will no longer appear.
Step-by-step: Update your other existing tabs
Repeat the same filter update for every other tab that could show TeleMFM exams (e.g. Submitted, Signed, any custom tabs).
- Open the tab you want to update.
- Go to the tab's filters → Examination status.
- Make sure Referred by is not selected.
- Save the tab.
- Repeat for all remaining tabs.
💡 Tip: Your old "Referred by" tab is no longer needed with the new setup so you can safely delete it.
Step-by-step: Add the TeleMFM platform column
This adds the blue TeleMFM badge to your dashboard rows so you can identify teleMFM exams at a glance.
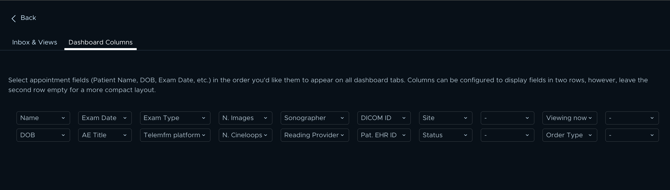
- Click Settings in the upper right of your dashboard.
- Select Dashboard columns.
- In one of the available column tiles, scroll down and choose TeleMFM platform.
- Exit. A blue TeleMFM badge will now appear on any exam referred via TeleMFM.
Step-by-step: Set up recommended daily workflow tabs
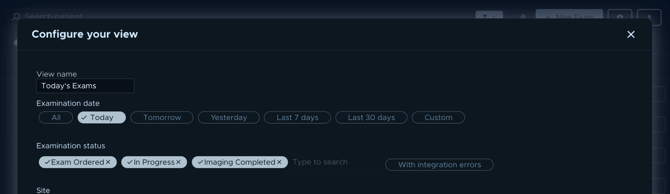
To-do of the day — exams you need to complete today:
- Create a new tab (or update an existing one).
- Set Examination date to Today.
- Set Examination status to: Exam ordered, In progress, and Imaging completed.
- Exit. This gives you a focused list of reports to fill in for the current day.
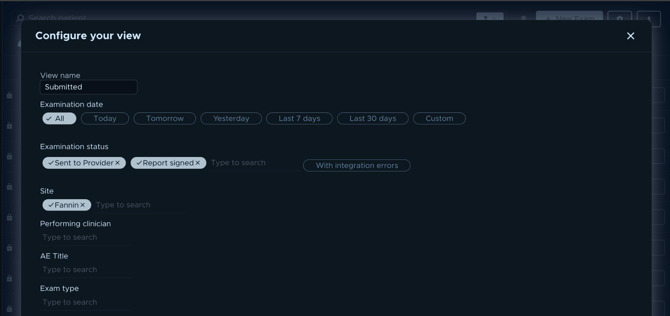
Submitted exams tracker — to check whether exams you've sent have been reviewed or signed:
- Create a new tab (or update an existing one).
- Set Examination date to the relevant timespan.
- Set Examination status to Sent to provider and Report signed.
- Either:
- Click your name in Performing clinician to track only your own exams, or
- Leave it blank and select the relevant Sites to also include your colleagues' exams.
- Exit.
Step-by-step: Create an optional tab for exams sent via TeleMFM
If you want to isolate exams sent via TeleMFM into a dedicated view:
- Click + New tab on your dashboard.
- Set the following filters:
- Reading provider: MFM’s Name
- Examination status: Sent to provider and Report signed
- Name the tab (e.g. Dr. Smith cases).
- Exit
💡 Tip: This tab is optional. If you skip it, the MFM’s exams will simply appear in your standard submitted/signed tabs alongside all your other exams.
Common questions / troubleshooting
I'm seeing TeleMFM patients twice on my dashboard.
One or more of your tabs still includes the Referred by exam status. Open each tab's filters and deselect Referred by.
I don't see the blue TeleMFM tag on exams.
Add the TeleMFM platform column to your dashboard — see the step-by-step above.
My old "Referred by" tab is empty.
That's expected with the new setup. You can delete this tab.
I'm not sure which tabs still have the Referred by filter active.
Open each tab one by one, check its filters, and remove Referred by from the Examination status selection wherever it appears.